JKDefrag is an Open Source Windows drive defragmenter, with both a command line and graphical user interfaces available. Rivals Executive Software's Diskkeeper!
CobianBackup is a Windows backup of a different breed - I'll be blogging on this gem more, I'm sure. It can compress and encrypt your information, so it' s HIPAA compliant!
Monday, December 03, 2007
Wednesday, November 07, 2007
Using CrossLoop to Get Help
I found this utility for fast and easy Windows desktop sharing called Crossloop. This program is very easy to install, and oh yeah, it's supposed to be secure, too.
Any time you need to help out a friend or coworker, use this tool - it will save a lot of time and headache! Watch the video above to get started.
If you get a Windows Firewall warning, click Always Allow.
If you get a Windows Defender warning, click Review, then, under the action column, select Always Allow.
Tuesday, November 06, 2007
Medicare Part A Submission (EDI) - Revisited
In my January 24, 2007 post I described the tools needed by nursing homes to submit Medicare claims for reimbursement. A few weeks ago, batch submittal became much faster, but a bit more complicated from your computer support staff's point of view.
What's new? Just the way that you connect to the AT&T Global Network. If you have an high-speed Internet connection, you now have the option of using a VPN (Virtual Private Network) to connect. What does this mean? Well, you don't need a modem. And it's faster. Much faster.
So how do you get it? First, call IVANS and request a new VPN account - your current dial-up username and password won't work. They will fax you a form to fill out and fax back. three to five days later, they will fax or mail a confirmation message. Once you have received this, go to the IVANS Download Page and find the column that best describes your operating system. If you're not sure, find My Computer, right-click on it, and select Properties. What will come up is a window describing your computer, and the info in the upper-right area is what is most important as it will say Windows 98 or 2000 or XP or whatever. Pick the VPN Access software appropriate for your computer, download it and save it someplace safe. Next, download and print out the VPN Enabling Guide that is appropriate for your computer - it is a must-read for making this go. Don't worry, they make it easy!
Warning, one major irritation is the included Firewall. I think it's nice of them to want to protect us from evil hackers and all, but it can cause some headaches. Like making your computers shared files and printers unavailable to your coworkers. So after you have finished with the instructions you have printed out, make sure and click Start -> Programs -> AT&T Global Network -> AT&T Firewall, then click Off. Save this setting and you're ready to rock!
Thursday, October 25, 2007
I Hate HP All-In-One Printers
The title says it all. They seem affordable, look nice on a desk, and promise easy setup. HP has deceived us. Ink is way over-priced, and setup can be a nightmare.
For the last 6 years, HP has produced multifunction Printer/Scanners/Copiers (PSC's) and PSC's with Fax (All-In-One, or, AIO). Seldom has Windows happily accepted the software then continued to work well without a hiccup. Most typically, just getting Windows to load the software has been enough to make me want a beer. And a hammer. Just a few days ago, I went to set up a AIO expecting it to take under an hour. Four hours later, I had found a solution. It wasn't easy, but once I completed these instructions, I was able to set up the printer and make it work as expected.
This shouldn't be necessary, and is enough to make me say I hate HP All-In-One's,but, they still look good on a desk.
Tuesday, October 16, 2007
Taking Screenshots is OS X
OK, so our Apple's didn't come with that handy "Print Screen" button, so in OS X have to use obscure key combos.
| Key Combination | Result |
|---|---|
| Command+Shift+3 | Capture entire screen and save as a file |
| Command+Control+Shift+3 | Capture entire screen and copy to the clipboard |
| Command+Shift+4 | Capture dragged area and save as a file |
| Command+Control+Shift+4 | Capture dragged area and copy to the clipboard |
| Command+Shift+4 then Space bar | Capture a window, menu, desktop icon, or the menu bar and save as a file |
| Command+Control+Shift+4 then Space bar | Capture a window, menu, desktop icon, or the menu bar and copy to the clipboard |
(This is from MacDevCenter)
Saturday, October 06, 2007
Tools that make my geeky life easier:
This fellow (http://www.mcse2000.com/download.php)has created some very useful tools for Windows Server administrators.
My favorites?
Well, I like NTBackup Print Log because it does that: watches for NTBackup to finish, then finds the last log file and sends it to a printer. This helps supply some of NTBackup's missing functionality (however, I need a utility that helps make scheduling simpler and one that adds support for pre/post-backup commands).
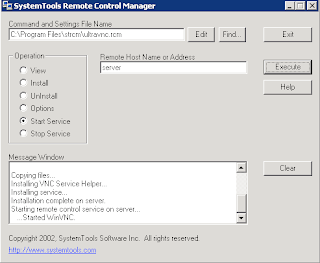
The other indispensable tool is the frighteningly effective Ultra VNC Pusher which can push VNC into a remote Windows computer to which you have SMB access. Not for the faint of heart!
Wednesday, September 05, 2007
New MDS/OASIS VPN Connection Available
Thank goodness, we can finally begin ditching those obnoxious dial-up modems and use the broadband that we all know and love by downloading the client from https://www.qtso.com/mdcn.html. CMS has given nursing homes the ability to submit MDS's via the Internet using a virtual private network provided by AT&T Global Networking. The client is easy to set up, and seems to work well in Windows 2000 and XP. But my joy ended here.
Apparently our friends as CMS forgot that we are all highly dependent on our computer networks and that we occasionally keep important stuff like MDS files on a network drive. So when we connect to MDS/OASIS using the VPN and try to upload our MDS's from a network drive thenetwork drive is unreachable and we cannot select and submit our files.
I did what any good tech does before pulling his hair out - I called tech support. The guy at CMS tech support was friendly and knowledgeable, and acknowledged that this is a problem. Furthermore, the tech assured me that this is by design. Apparently the rest of our network presents a threat to CMS's computers (I'm paraphrasing here), so the machines that connect to CMS are quarantined from their network.
The tech went on to explain that CMS expects users with networked computers to copy MDS's from the network to their computer prior to connecting to the MDS/OASIS site.
Instead of manually copying these files, I created a batch file to copy them automatically and then launch the AT&T Global Network Client once the copy has completed. Here's how you can make your own:
- Create a text file on your desktop and rename it to a batch file by changing its filename extension to .bat - I named mine MDS-OASIS.bat
xcopy m:\marktech\XFEROUT\*.mds c:\XFEROUT /d /v /y /i
"C:\Program Files\AT&T Global Network Client\netclient.exe"
exit
- There a LINE BREAK (in other words, press Return) at then end of each line if you're typing this.
- Save this file as a .txt file and rename it as a .bat file. If you don't know how to do this, consult a computing professional.
- When you run it, a DOS window will open, it will copy all .MDS files that you don't already have to the folder c:\XFEROUT, then invoke the AT&T Global Dialer.
- When you finish your transfer and close the dialer, the DOS window will disappear.
/d only replaces files that are newer than ones on the target drive
/v verifies that each file is copied correctly
/y suppresses prompting to overwrite files on the destination computer
/i causes xcopy to assume that c:\XFEROUT is a directory, not a file.
Wednesday, August 29, 2007
Let's Waste some Time!
OK, so you've done everything on your to-do list, you're all caught up on your sleep, you're in front of your computer, and you have nothing to do? Leave Solitaire alone and rot your brain the traditional way - by watching TV on your computer!
Joost.com has a Beta program that works on both Windows and Mac that allows you to watch TV on demand. Now we're not talking live TV here, we're talking a list of channels, each with a list of already-run shows. So, if you missed a few episodes, this may be the place to find them. There's MTV, Cartoon Network, WB, Indy 500, NHL, BET, and a Sports Illustrated Swimsuit channel! Myself, I've been catching up on Metalocalypse.
Now, if you want original, more current content, check out Miro, an application which is best described as RSS [RSS defined]for video - it can be pointed at video blogs (called channels in Miro), and it will automatically download the videos whenever updates appear. I love the science and how-to stuff, expecially from Make magazine. Since this can reach out and get whatever you can find online, it is a very powerful tool - it can search Google, YouTube, and other video sources. Furthermore, it downloads and saves those videos, which allows them to be transferred to an iPod, shared with friends, or just saved for later. This program keps me thoroughly entertained when I dn't have an Internet connection because it downloads whatever you desire then saves it for later!
Joost.com has a Beta program that works on both Windows and Mac that allows you to watch TV on demand. Now we're not talking live TV here, we're talking a list of channels, each with a list of already-run shows.
 So, if you missed a few episodes, this may be the place to find them. There's MTV, Cartoon Network, WB, Indy 500, NHL, BET, and a Sports Illustrated Swimsuit channel! Myself, I've been catching up on Metalocalypse.
Now, if you want original, more current content, check out Miro, an application which is best described as RSS [RSS defined]for video - it can be pointed at video blogs (called channels in Miro), and it will automatically download the videos whenever updates appear.
 I love the science and how-to stuff, expecially from Make magazine. Since this can reach out and get whatever you can find online, it is a very powerful tool - it can search Google, YouTube, and other video sources. Furthermore, it downloads and saves those videos, which allows them to be transferred to an iPod, shared with friends, or just saved for later. This program keps me thoroughly entertained when I dn't have an Internet connection because it downloads whatever you desire then saves it for later!
Tuesday, July 17, 2007
Secure Windows Remote Desktop - Part 2, Clients
So, you need to tunnel Remote Desktop, and your servers are all set up, right? Good.
Now get Putty.exe for you client computer from HERE and run it.
Fill in your IPCop's host name or public IP and then change the port to 222.
Next, expand Connection, then SSH and select Tunnels.
Add a new forwarded port source 3399 (since this one isn't commonly used) and forward it to the target server's internal IP (NOT the IPCop's IP!) and add a :3389 to the end of the string as in the second figure.
Go back to Session, click Save, and give this connection a name. Click Open, and you will be prompted for a username and password - give these (preferably the remote user we created earlier instead of the dangerous root user) and you will get a prompt. You're done with Putty for now!
Now go to Start, Run, and type mstsc.
Fill in the Server line with localhost:3399 and hit connect. If all been done correctly, you will get a remote desktop on your target machine.


Now get Putty.exe for you client computer from HERE and run it.
Fill in your IPCop's host name or public IP and then change the port to 222.
Next, expand Connection, then SSH and select Tunnels.
Add a new forwarded port source 3399 (since this one isn't commonly used) and forward it to the target server's internal IP (NOT the IPCop's IP!) and add a :3389 to the end of the string as in the second figure.
Go back to Session, click Save, and give this
 connection a name. Click Open, and you will be prompted for a username and password - give these (preferably the remote user we created earlier instead of the dangerous root user) and you will get a prompt. You're done with Putty for now!
Now go to Start, Run, and type mstsc.
Fill in the Server line with localhost:3399 and hit connect. If all been done correctly, you will get a remote desktop on your target machine.

Secure Windows Remote Desktop - Part 1, Servers
The example I give is for a Windows client to connect to a Windows 2003 server behind an IPCop Firewall without granting root access to said firewall. So if a tech needs in, this is a sound way to grant him or her access.
Some background: Microsoft RDP (Remote Desktop Protocol) has vulnerabilities with regards to security and encryption (details are beyond the scope of this post). If we use a protocol that is more secure (namely SSH), then tunnel RDP through the more secure protocol, we wind up with a much more secure implementation.
Requirements:
SSH to your IPCop as root and sign in.
Some background: Microsoft RDP (Remote Desktop Protocol) has vulnerabilities with regards to security and encryption (details are beyond the scope of this post). If we use a protocol that is more secure (namely SSH), then tunnel RDP through the more secure protocol, we wind up with a much more secure implementation.
Requirements:
- IPCop Firewall - or your favorite Linux distro server serving up SSH on a public IP address - I'll only address IPCop, but this can be generally applied.
- Remote Desktop Server (Like Windows XP Pro or Windows Server 2003 - other protocols like VNC will work with this, you just ned to know the required ports to fill in on your Putty Tunnel settings.
- A Windows client with Putty installed (it's easy, just go here -- and download putty.exe)
SSH to your IPCop as root and sign in.
Create a new user called remote as a member of a new group (also named remote) and use this user for shared remote access. As root, issue the following commands to add the new user:
groupadd remote
useradd -s /bin/bash -g remote -m -k /dev/null remote
The meaning of the command line options (from ifs.vlsm.org):
- -s /bin/bash
-
This makes bash the default shell for user lfs.
- -g remote
-
This option adds user remote to group remote.
- -m
-
This creates a home directory for remote.
- -k /dev/null
-
This parameter prevents possible copying of files from a skeleton directory (default is /etc/skel) by changing the input location to the special null device.
- remote
-
This is the actual name for the created group and user.
To log in as remote (as opposed to switching to user remote when logged in as root, which does not require the remote user to have a password), give remote a password:
passwd remote
Subscribe to:
Posts (Atom)